Preliminary
Since version 2.0, Qucamba Reports fully supports Microsoft Dynamics 365 Business Central (in the following referred to as "Business Central"). With only one application, Qucamba Reports 2.0 lets you create, style and preview reports for Microsoft Dynamics NAV (NAV) as well as for Business Central. No matter, if you're "on premise or "in the cloud". Each profile decides about how you're going to connect Qucamba Reports to your application. Thus, no explicit version of Qucamba Reports is required to connect to Business Central. However, Qucamba Reports 2.0 should be installed using the
Complete installation type which can be selected in the Qucamba Reports installer.
There are different ways of using Qucamba Reports for Business Central. You can use Qucamba Reports for Business Central for developing extensions or you can use it just for managing custom layouts directly in the application. There're two connection types to distinguish. In a sandbox environment, Qucamba Reports can be connected to Business Central the conventional way by using a direct database connection and C/SIDE. For all other Business Central installation types, Qucamba Reports connects to the Qucamba Reports app which is shipped along with Qucamba Reports and must be installed on the Business Central tenant.
This tutorial covers connecting Qucamba Reports to Business Central using the Qucamba Reports app. However, connecting to Business Central the conventional way with direct database access and C/SIDE is equal to an installation for Microsoft Dynamics NAV 2015 or later which is described
in another tutorial.
In this tutorial, we describe to ways of connecting Qucamba Reports to Business Central:
Connecting Qucamba Reports to Microsoft Dynamics 365 Business Central using the Qucamba Reports Extension On Prem, in a Sandbox or in an Azure VM
This installation type relies on the Qucamba Reports app which needs to be installed in Business Central. The app is shipped along with Qucamba Reports and it's part of the "Dynamics 365 Business Central" component which can be selected during a custom setup of Qucamba Reports. If you installed Qucamba Reports using the
Complete or
Typical option, the component has already been installed on your local system.
Install the Qucamba Reports app on Business Central
To install the Qucamba Reports app follow these steps:
- On your local Qucamba Reports installation, use Windows Explorer to locate the folder %programfiles(x86)%\Qucamba Reports\Dynamics 365 Business Central.
- In this folder you'll find various example scripts which show you how to publish, install and uninstall the Qucamba Reports app. Select the appropriate script, create a copy of it somewhere from where you can edit and execute it and open it in an editor. Make changes to the script as required for your Business Central server and instance and save the script.
- Run your script to publish and/or install the Qucamba Reports app.
Note. After you published the app on your Business Central installation, you can use the
Extension Management page in Business Central to install and uninstall the app. Simply use the application's search to search for "
Extension Management". Here, you'll find a Qucamba entry which has a "burger"-menu containing options to install and uninstall the app.
Locate the Qucamba Reports service URL
Once you installed the Qucamba Reports app on your Business Central instance, use your Business Central client to open the
Web Services page (again, use the application's search to find the page).
In the
Web Services page, locate the
QucambaReports service and click the link in the
SOAP-URL column. The link should be opened in your web browser and there shouldn't appear any error message. Now, copy the entire link to your clipboard.

Create a Business Central profile in Qucamba Reports
Still having the service link in your clipboard, create a new profile in Qucamba Reports. You can do so by either opening Qucamba Reports from within the workspace folder of your extension or by clicking
New in the profiles section of the
START ribbon tab in Qucamba Reports. Either way, the
Create New Profile wizard comes up. In the version field, select "
Dynamics 365 Business Central" and proceed. On the next wizard step, you'll now find a line "
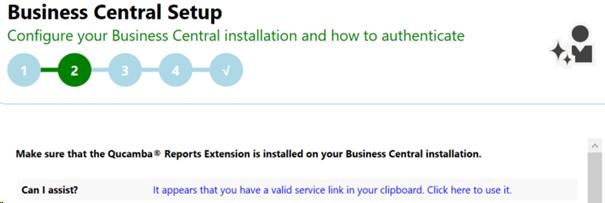
Can I Assist?" with a link. This link appears because Qucamba Reports detected that you have a valid service link in your clipboard.

Click the link to let Qucamba Reports configure your service automatically. If you don't see the link, either try to correct the link in your clipboard or configure your service manually.
Activate the Business Central profile in Qucamba Reports
After finishing the wizard, locate the profile's tile and double click it to activate the profile. If there's something wrong with the profile configuration, the profile's tile will remain grayed. In this case, move the mouse cursor over the gray tile and examine the tooltip for hints on why the Business Central installation isn't available.
Connecting Qucamba Reports to a Microsoft Dynamics 365 Business Central Cloud Tenant hosted on Microsoft Azure
When connecting to a Business Central cloud tenant on Microsoft Azure, you need to upload the Qucamba Reports extension to the Business Central tenant first.
Uploading the Qucamba Reports extension
To upload the Qucamba Reports extension, open your Business Central client and use the application's search to navigate to the
Extension Management page. From the
Manage menu, select
Upload Extension and follow the instructions.

The extension's .app file can be found on your local Qucamba Reports installation located under %programfiles(x86)%\Qucamba Reports\Dynamics 365 Business Central.
After uploading the extension, it will be installed automatically and the Qucamba Reports service should be available immediately after installation.
Locate the Qucamba Reports service URL
Once you uploaded and installed the Qucamba Reports app on your Business Central instance, use your Business Central client to open the
Web Services page (again, use the application's search to find the page).
In the
Web Services page, locate the
QucambaReports service and click the link in the
SOAP-URL column. The link should be opened in your web browser and there shouldn't appear any error message. Now, copy the entire link to your clipboard, open a new editor window and paste the link here. You'll need the link later for configuring a Qucamba Reports profile.

Preparing a Business Central User for using the SOAP Webservice
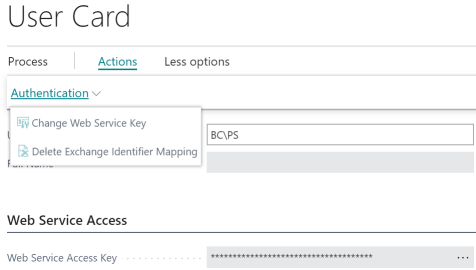
Use the application's search to locate the Users list page. From here, select the user you're going to connect with from Qucamba Reports and open the User Card. Locate the field Web Service Access Key under the Web Service Access section. If this field is still empty, you need to configure a web service key for this user to allow connections to SOA web services of this tenant through authentication of this user. To create a web service key, open the Actions menu (which might me hidden under the More Options link) and from the Authentication dropdown, click Change Web Service Key.
After creating the web service key, copy the entire content of the Web Service Key field to the clipboard and paste it into the editor window below the web service URL which you already created above. You'll need the link later for configuring a Qucamba Reports profile.

Create a Qucamba Reports Profile for your Business Central Cloud Tenant
After completing the steps above, you have a running installation of the Qucamba Reports extension as well as the service URL and your web service access key which you copied to an editor window previously.
From this editor window, copy the entire service URL to your clipboard.
Still having the service link in your clipboard, create a new profile in Qucamba Reports. You can do so by either opening Qucamba Reports from within the workspace folder of your extension or by clicking
New in the profiles section of the
START ribbon tab in Qucamba Reports. Either way, the
Create New Profile wizard comes up. In the version field, select "
Dynamics 365 Business Central" and proceed. On the next wizard step, you'll now find a line "
Can I Assist?" with a link. This link appears because Qucamba Reports detected that you have a valid service link in your clipboard.

Click the link to let Qucamba Reports configure your service automatically. If you don't see the link, either try to correct the link in your clipboard or configure your service manually.
In a Business Central Cloud Tenant, you authenticate by using a
User Name and
Password. The user must correspond to the user you configured to allow web service access above and the password is the web service key assigned to this user.
To configure authentication in the Qucamba Reports profile, uncheck the
Use Default Credentials option first. Then, in the
User Name field specify the same user account as you configured to be used in web services above. Copy the web service access key from the editor window which you copied previously from the
User Card to your clipboard and paste it into the profile's
Password field.
Click the
Test Service button to test the service configuration. If you receive an error message but you feel that it should work with your settings, repeat the test. Otherwise, the error message should give you a clue on how to get the configuration to work.
Start working with Qucamba Reports for Business Central
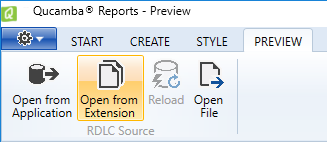
As soon as you have a configured and activated profile for Business Central you can start creating, styling and previewing reports, custom layouts and extension custom layouts. It's important to understand, that only those reports and custom layouts are contained in the workspace's reports part that have already been deployed to the application. However, you can also preview and style reports and custom layouts directly from your extension's development workspace folder. To preview from your extension workspace, select the
PREVIEW ribbon tab and in the
RDLC Source section, click
Open from Extension.

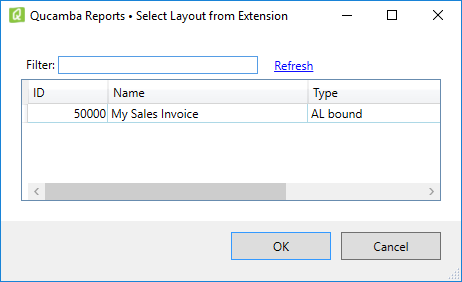
Then, select from the lists of layouts. The list contains all reports and custom layouts contained in the extension.

When creating a new report by using one of the Qucamba Reports wizards, the report is written to the extension's local development folder. Unlike in an on premise configuration, the report created is not opened in preview directly. This is because a report must be compiled by the AL compiler first. By building (not necessarily deploying) your app, the layout is being compiled as well and the report's dataset is integrated into the layout file. After building your app, just right-click your report layout and select
Open externally from the context menu to open the layout in your layout design tool. As soon as a layout design tool opens a layout, Qucamba Reports loads the layout into a preview tab.
Conclusion
Configuring Qucamba Reports to work with Business Central is an easy and straight forward task. After configuring a Business Central profile, you can work in Qucamba Reports in similar way as you did before in on premise installations. Since extensions introduce a new custom layout type that is part of an extension, Qucamba Reports lets you even style and create this new kind of custom layout.
Creating and styling RDLC reports for Business Central couldn't be any easier.

